
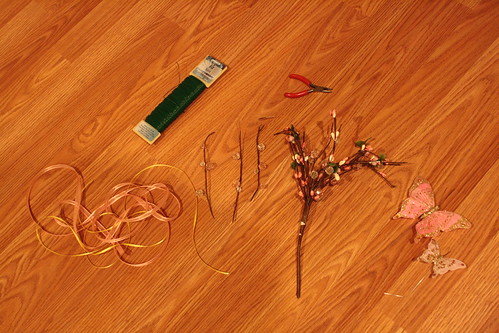

- Floral wire
- Two different colors of ribbon
- Pliers (Or heavy-duty scissors)
- Butterflies (Ashland Signature Accents from Michaels)
- Plastic floral garland (purchased from Michaels & can be found in the Valentine's Day section)
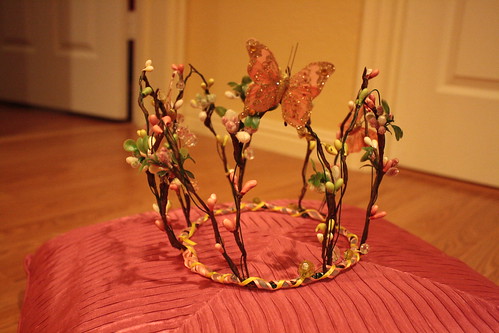
Directions:
- Cut out three pieces of green wire and twist them together. Twist at end to form a circle. This is the base of the crown. Make sure it fits around your head.
- Now cut out seven to nine pieces of green wire that are of equal length. (Mine were about 15 inches long.) These will help form the top of the crown.
- Fold each piece in half and attach each end about 3 1/2 inches apart on the base of the crown. Continue doing this with all the pieces. (My crown was about 5 inches tall.)
- This is now the frame of the crown.
- For the floral garland, like that featured in the second photograph, separate each strand by unwrapping the outer wrapping that holds all the garland together. (Notice in picture two the three separate pieces of garland, these were taken from the full piece of garland.)
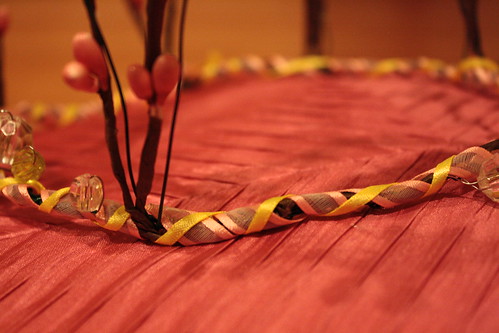
- Wrap the garland around each side of the upper part of the crown.
- Next you will wrap one color of ribbon around the base of the crown and tie it together at the end.
- Repeat step seven with the other color of ribbon.
- Now take your butterflies and place them wherever you choose.
- Let the wild rumpus start! ★

P.S. I received a Sunshine Award from the lovely S and O Productions. Thank you, S&O!


How wildly lovely! It would be perfect for a little girl's birthday party. You have a beautiful imagination.
ReplyDeleteWow wow WOW! A spring fairy's crown! This is so wonderful I can't even begin to explain how much I love it. Aaaah!
ReplyDeletethis is beautiful, i shall definitely be trying this out.
ReplyDelete:)
x
breathtaking
ReplyDeleteSoooo beautiful, I love it! Your blog is wonderful :)
ReplyDeletex
http://sparklesmiledance.blogspot.com
WOW!!!!! That is so gorgeous. I'm definitely going to do this when I get some time. Maybe spring break.
ReplyDeleteoh i LOVE this, it's perfect! so so so pretty! i want to make one now :)
ReplyDeleteoh my goodness, this is just amazing! you are inspiring me to get out my crafting box which has been sadly gaining dust under my bed for months :(
ReplyDeleteamazing krissie!!!!! it looks beautiful!! thank you so much for posting!
ReplyDeletethat looks so darling! if i had a daughter, i'd make a different one for her to wear every day of the year. but... as i don't have a daughter... i guess i'll just make some for myself. thank you for the instructions! i might make a few mini ones for all the porcelain dolls i was given as a child.
ReplyDeleteWOW!! so darling!! lovely colors! I think I will save this for a year from now when my little girl grows up just a few more months ;)
ReplyDeleteOh wow, that is probably one of the most amazing things ever! It's so intricate and delicate and exquisite and every other possible synonym of those things :D I am definitely doing this at some point in time (:
ReplyDeleteoh gosh that crown is the most amazing crown I have ever seen..oh dear, I am just so besotted. you are so creative, lovie ♥
ReplyDeletexx your forever friend, olivia
Awww...it's so cute! I love it. Reminds me of the loveliness of spring.
ReplyDeletethis is so beautiful - I'm definitely going to try it. Lovely work, again.
ReplyDeletelovely :D
ReplyDelete-Vee
Oh wow, this is absolutely beautiful!
ReplyDeleteWhoa, this is absolute perfection! I didn't think your crown would be this elaborate! very beautiful indeed:)
ReplyDeletethat's such a stunning crown
ReplyDeletelove your blog! :)
- Audrey Allure <3
http://audreyallure.blogspot.com
I expected it to be pretty, but this really blew my mind. It is simply mesmerizing and gorgeous, well done!
ReplyDeleteKRISSIE I LOVE THIS! Man Im going to LOVE having you around. I have a project that i was hoping to do this year and this crown would be perfect in a part of it!!! I might not be able to do this project til next year- but i can start on it this year lol. i love this crown- what made you wanna make this? did you come up with it all on your own or did you find someone online or in a book? and tried it? I LOVE THIS COMPLETELY. I want one :o) heehee.
ReplyDeleteJerrica, I came up with the idea all on my own. As for the idea of making a crown- it came from listening to Where The Wild Things Are record because the boy in the movie has a crown (although mine looks nothing like his).
ReplyDeleteWhat a lovely crown...thanks for the DIY. xoxo
ReplyDeleteHiya!
ReplyDeleteThese are such gorgeous shots! Can't wait to see some pics of u wearing it :-)
Love love.
Panda xx
Oh, and thanks so much for your adorable comment!
so pretty.
ReplyDeletehttp://www.daniellebarbe.blogspot.com
This is exquisite! My daughter said she would love to make this ~ thank you for providing the instructions!!
ReplyDeletexoxo,B
how do you attatch the butterflies to the crown?
ReplyDeletelauren, the butterflies i bought had the wire attached to the end. so i just wrapped the wire around the part of the crown i wanted it attached to. hope that helps. xx
ReplyDeleteoooo that's nifty! did you get them at michaels or some other craft store?
ReplyDeletei purchased everything at michaels. =]
ReplyDeleteIt is the most beautiful crown I've ever seen... no kidding! :D
ReplyDelete<3
LOVE this! It's so beautiful. I will have to make one for myself. Too pretty to resist.
ReplyDeleteLOVE this. It's so beautiful. I will have to make one for myself. It's too pretty to resist.
ReplyDelete